


Share your craft projects
Make new craft buddies
Ask craft questions
Blog your craft journey

Lightweightladylefty
1217 posts
and
27 followers
in over 12 years
in over 12 years
More from Lightweightladylefty


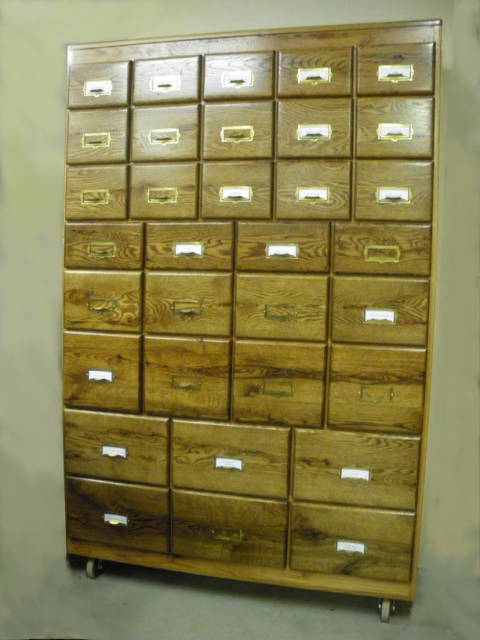
33-Drawer Shop Storage Cabinet


THIS IS NOT MEANT TO BE A WORK OF ART. I’M A UTILITARIAN TYPE!
Even though its main feature isn’t dovetails, they are a major portion of the work — 132 dovetail joints (33 × 4)!
This is another of those years-long projects. I started this cabinet about 25 years ago after seeing a cabinet made from WWII munitions boxes. I have always liked small drawers for organizing things. Originally, I had planned 40 identical drawers. I first made the two end panels, using the leftover ¼” oak plywood from a kitchen remodel, hence the dark finish. At that time I began making the drawer boxes out of plywood. Before I completed all of the drawer boxes, I moved to the country and decided not to bring them with me.
The project sat on hold for years while I concentrated on completing more important projects. In the meantime, I decided to redesign the cabinet to better contain various items in the shop. The only parts I had were the end panels and my only criterion was that it needed to fit on a wall where I had open shelving that I wanted to remove. (I really hate open shelving in the shop because everything on it collects dust!)
I am not fast at woodworking, so dovetailing 33 drawers with my rinky-dink dovetail jig took a long time. Then because the winter was S-O-O-O cold, I didn’t want to spend hundreds of dollars in astronomical gas prices to heat it 24 hours a day when the cabinet only cost me a few dollars to make, so I waited until the weather warmed to varnish it. (I generally turn the heat down to 52 when I’m not working and only turn it up to 62 when I am working which obviously wouldn’t work for finishing.)
And the varnishing took FOREVER! I had purchased 2.5 gallons of Minwax for a bargain $19.95 last year. What I didn’t realize at the time was that it was not their fast-drying poly, but rather high-build poly. Well, there is a world of difference between the two and I really hate the latter. I don’t like the color; I don’t like the consistency. I thought this cabinet would be a good way to use up a bunch of it but I still have over a gallon left. (I need to think of some more “junk” projects on which I can get rid of it!)
I had wanted the rails and stiles to contrast the panels and drawer fronts but I didn’t manage to match the drawer fronts to the panels. I still had the 33-year-old stain from the kitchen remodel, but what was left was too thick and then I thinned it too much. And the high-build poly is so dark that almost no contrast is visible on the front.
The only purchases I made to complete the cabinet were a 4’ x 8’ of ¼” lauan plywood and the #1 screws for the nameplate pulls. I ordered a package of 100 screws, knowing that I needed 99 and hoping I wouldn’t break any. The package arrived with only 96. (Note the missing hardware on right end of row 6.)
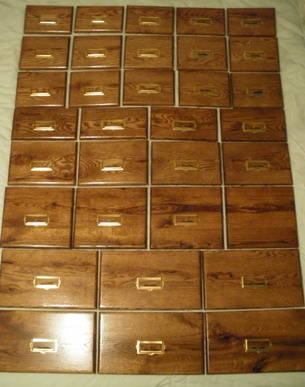
The eBay vendor was kind enough to send me the missing screws plus 2 extra. Miraculously, I never broke or lost any. (I had purchased 40 nameplate pulls 25 years ago and the heavy duty casters were purchased years ago – 50% off at HF.) All the rest was made from scrap plywood (drawer bottoms), scrap oak and a conglomeration of poplar that includes some curly and spalted pieces. (The fun grains and spalting were too sporadic to be used for any sizable project. All of the lumber was milled off our property years ago so I consider it free!)

Originally I was going to use oak for the drawer boxes but decided the weight would be prohibitive. I’m hoping (praying) that the cabinet is sufficiently engineered and will not collapse once it’s filled. (I’m not filling drawers with heavy hardware.)

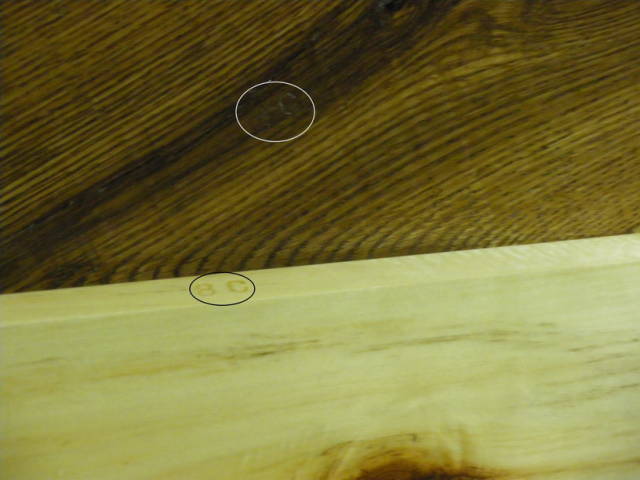
Because of my lack of precision, there are no two drawers which are identical so each drawer had to be marked with its position. (The wooden runners attached to either side are not aligned correctly with the center runners and drawer boxes differ by up to 3/32” in width.) I also marked the drawer fronts so I could get them back onto the correct drawer boxes.
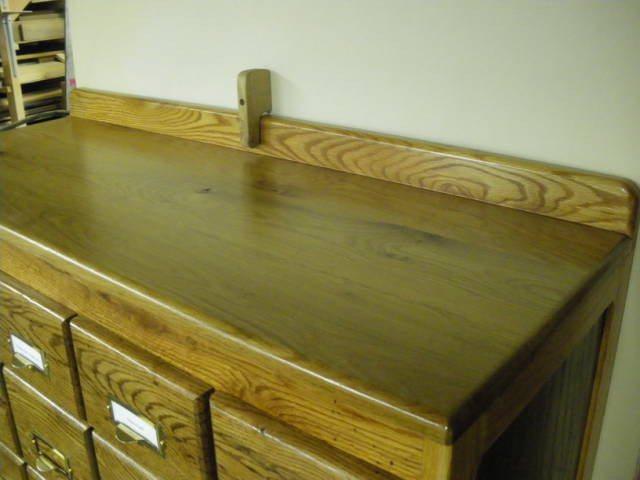
Since the cabinet is only 15” deep, I attached it to the wall so it won’t tip over. I needed to be able to easily move the cabinet when I want to run longer stock through my drum sander so I made a simple wall cleat. The cabinet is 40” wide and 62” tall, (any taller and I wouldn’t be able to see into the drawers!)
I’m hoping that this cabinet will help me get my shop better organized (wishful thinking). I’ve at least gotten a start at it!
Posting this on dial-up took almost as long as making it! LOL
Thanks for taking a look.
L/W
“Those who would give up essential Liberty, to purchase a little temporary Safety, deserve neither Liberty nor Safety.” Benjamin Franklin
17 Comments
Now this l like! In my opinion The uniqueness of the project and the timeframe involved makes this a classic creation. Definitely a one of a kind!Congrats
Wow that is one big organizer cabinet and should make it easy to find stuff that is stored within with the labeling on the drawer pulls .
I like that you made it mobile and can secure it to the wall .
Great job and thanks for the extra long writeup and pictures of the build .
L/W,
Now that’s what I call a storage cabinet!
I really like how you configured the different drawer sizes, nice design and well done.
Great story to go along with it.
John @The Hufford Furniture Group
Ken and kiefer, One less excuse for my clutter! I hope this will help me get better organized in the shop. My time is running out . . .
kiefer, the “extra long writeup” is just another way for me to get in my 100,000 words a day that supposedly every woman needs to say!
Thanks for your encouraging words.
L/W
“Those who would give up essential Liberty, to purchase a little temporary Safety, deserve neither Liberty nor Safety.” Benjamin Franklin
Huff,
Just to show how slow my dial-up is: Your comment was not yet shown when I started to make my response to kiefer and ken. By the time it posted and I was finally able to get the page to come up again, your post is shown 34 minutes prior to mine! Gotta love living in the dark ages!
Thanks for your comments.
L/W
“Those who would give up essential Liberty, to purchase a little temporary Safety, deserve neither Liberty nor Safety.” Benjamin Franklin

WOW! Now this is a piece of artwork, utilitarian artwork! Forty, yes 40, dovetailed drawers! You win. We are not worthy, we are not worthy…
HorizontalMike

Love the history of it. I like the markings too.
A lot of work when in those drawers.
The whole thing came up really nice.
Well done!
Abbas, Castro Valley, CA

25 years to get it perfect. That’s patience! Nice job. I especially like the removable wall cleat. Great idea.
Losing fingers since 1969

this is fantastic!!
I, too, have always loved the thought of small drawers for storage … oh how I’d love to have one of these cabinets in my home…. dreaming of one in my kitchen!!
LOVE IT
JAGO - just a grandma’s opinion

When I first saw this project I was going to come up with a wise crack about why didn’t you dovetail the drawers…but you did! I struggled with just one drawer recently, couldn’t imagine 33 of them. It’s a really great build! It reminds me of a card catalog in the library. Do they even have those anymore??
Where are the band-aids?---Pro Libertate!
Mike, I guess I didn’t clarify it when I said I originally planned 40 identical drawers. Don’t give me credit for so many . . . there are only 33. LOL Now I have 7 of those label holder pulls left for another project!
lanwater, the rustic oak does have some pretty characteristics . . . just not what most people would want for quality furniture.
Brian, I’m not so sure about getting it perfect, but at least I finally got it done!
Debbie, we’ll be waiting to see your kitchen cabinet . . . sooner than 25 years from now, we hope!
Monty, the dovetails are not done by hand. I used a dovetail jig and router with dovetail bit. Because I’m such a cheapskate (about a $40 dovetail jig), I did have my problems with setups but came up with a few more jigs and solutions of my own to make that easier. I’m a disaster with hand tools so I only dream of hand-cut dovetails.
Bently, if I have a swelled head, it shouldn’t be from pride in finishing the cabinet but from all that head-banging to get it to work. You’re right, I had to measure every drawer for the dado (groove—I’m told that’s the correct term for lengthwise grain) to fit the runner properly and not have the drawer cockeyed! And then some of my tolerances were a bit too close after it was varnished and I had to do more adjustments. I’m hoping that there won’t be too much wood movement with the poplar and that it won’t require more adjustments later on. I can only dream of moving up a few million notches to your level on the craftsmanship scale!
L/W
“Those who would give up essential Liberty, to purchase a little temporary Safety, deserve neither Liberty nor Safety.” Benjamin Franklin
Jig and router or not, that’s still a heck of a lot of dovetails! I applaud your patience.
Where are the band-aids?---Pro Libertate!
Whew, what a lot of work. I admire your tenacity! Beautifully done.
Might As Well Dance : http://barbsid.blogspot.com/

Impressive cabinet! I don’t think I’d have had the patience to dovetail all the drawers.
Rob, Sault Ste. Marie, Ontario

Wow that’slot of drawers,great job.
woodworking classes, custom furniture maker

Outstanding!!
Jack

I need that! : )
Amor Vincit Omnia
More from Lightweightladylefty