


Share your craft projects
Make new craft buddies
Ask craft questions
Blog your craft journey

Mike40
1074 posts
and
35 followers
in almost 12 years
in almost 12 years
CHRISTMAS GIFT BASKETS #2: Preparation of Materials (continued)
This is
part 2
in a
8 part
series:
CHRISTMAS GIFT BASKETS
-
Materials Preparation
-
Preparation of Materials (continued)
-
Chase to the cut
...
- Materials Preparation
- Preparation of Materials (continued)
- Chase to the cut
...

Yesterday the basket side blanks were prepared. Today was used to prepare the materials for the bottoms, the top rims and the bottom wrap around feet.
I’ll take each item in turn to explain and show with photos how each part is prepared together with dimensions, but first a little general info just to give you a little insight into the pieces that go into the build.
Angles summary
- The sides are angled outwards from bottom to top at 15 deg. with top and bottom edges angled at 15 deg.
- The feet angled outwards from top to bottom at 15 deg.
- The inside and outside edges of the top rim are angled outwards from bottom to top also at 15 deg.
- All corners will be mitered at 45 deg.
- The 4 outside edges of the bottom piece will be angled outwards from top to bottom
- Sides & Feet
The angle configuration requires that the top and bottom edges of the sides and the feet be ripped parallel at a 15 deg. angle . When placed into position the result will be a flat surface to join the sides with the feet.
- Top Rim
The top rim is requires a 15 deg. cut along the inside and outside edges and the top and bottom are flat.
- Corners
All of the above components will be joined into 3 squares cut with 45 deg. miters. These miters will in fact be compound miters, but the cuts will require only one 45 deg. saw setting because the parts will be positioned on the saw just as they will be in the finished basket. An auxiliary fence with a 15 deg. angle on it’s face will be used to correctly position the pieces for cutting.
- Bottom
Only the outside edges are angled at 15 deg. outwards from bottom to top.
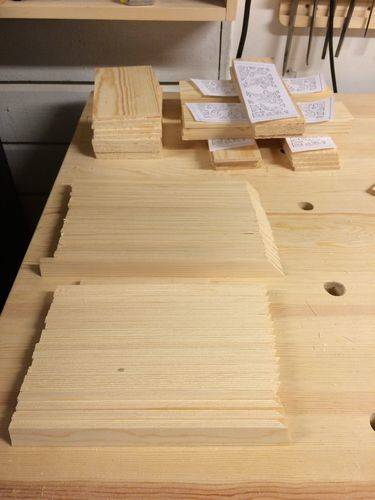
PARTS PREPARED TODAY
The components have all been cut a little larger than final dimensions to allow for any necessary adjustments.
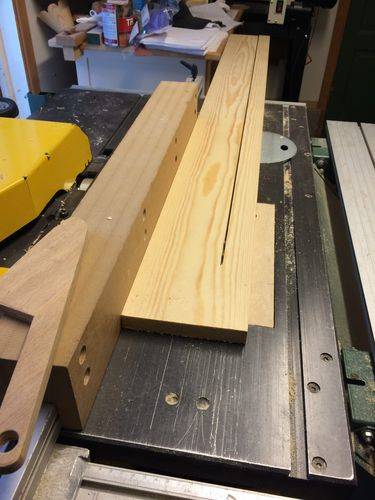
- Bottoms
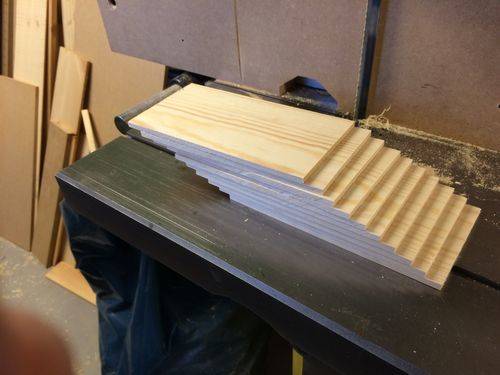
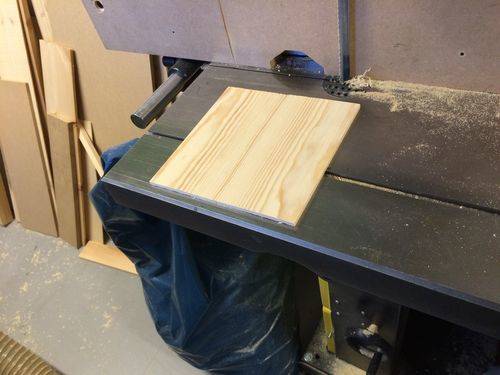
The bottoms will be prepare with two matching pieces with a glue joint down the middle. I first ripped a 2.1cm board to a width of 10cm and then resawed it into to 2 pieces and planed them smooth to 5mm thick. The were then cut to a finished length of 20cm ready for joining. I will do some very light sanding on a sanding board prepare the inside edges for joining. The 15 degree angle on all the outer edges will be done after the bottoms are glued up. See below:
- Top Rims and Feet
The top rims and feet were prepared in the same way and with the same machine set ups except that the feet pieces are shorter than the rim pieces as the basket is angled inwards from top to bottom so only the stop on the miter saw had to be readjusted for that difference.
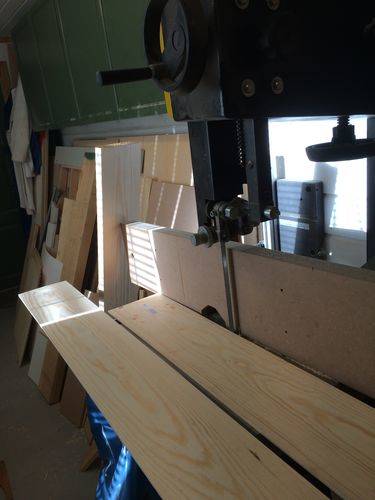
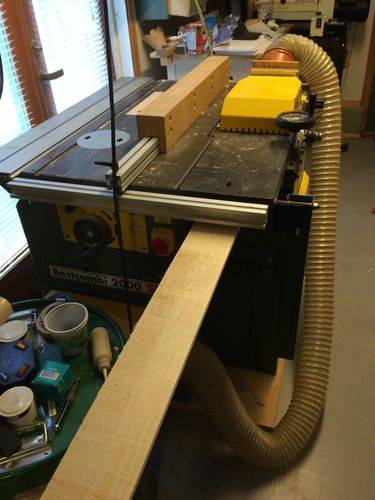
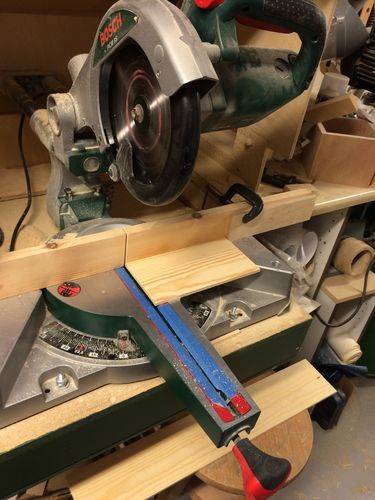
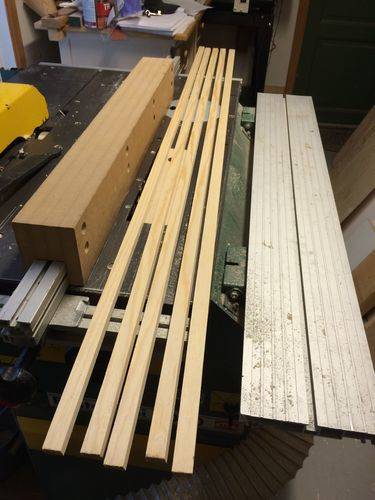
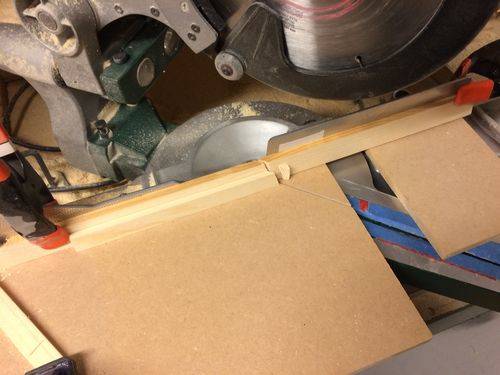
First a boards were resawn and planed to 7.5mm The first photo shows the parallel angles marked for the strips which were the ripped at a 15 deg. angle with a width of 17mm per strip on the table saw. The strips were then cut to lengths about 1cm longer than the finished length in the miter saw with the same set-up used for the bottoms in photo 3. An angle fence with a 15 deg. angled face was then cut on the table saw and attached to the miter saw fence and a zero clearance auxiliary top added to miter saw table. The miters were then cut on one end of each rim and foot piece at a 45deg. setting while resting agains the angled fence in the same position they will occupy in the finished basket. This cut yields a compound miter angle with only the one saw setting. Once the basket sides have been scrolled, mitered and glued up, I will cut the other end miter on the rim and foot pieces measuring directly from the basket sides to ensure accuracy.


- Results so far
All the materials are cut as shown or at least rough cut. The ends of the side pieces will not be mitered until after the scroll work is finished. This makes it easier to accurately stack them for cutting. The top and bottom edges of the sides will also have to be angled at 15 degrees. This will be done on the hand sanding board after the the sides have been glued up to insure a consistency flat surfaces for gluing the rim and foot pieces to.
About 3 hours were used for today’s work. A total of 5 hours on the project so far or 1 hour per basket. This is a great project for production work. Setting everything up takes a little time with three machines involved, but the set-ups are used for more than one part and it all goes pretty quick considering we have now prepared 70 blanks altogether.
I guess the text is a little over the top but I am always worried I will leave out important info or steps. I will include all the dimensions for each component as I cut them just prior to assembly. I suggest you wait until the blog is finished before you begin making them yourself so you will be able to better evaluate the process and perhaps do it in a way better suited to your own preferred methods and tools at hand. I will be more than happy to answer any questions you might have. Thanks for following with.
Mike, an American living in Norway
1 Comment

Following along Mike.
What’s the strange looking machine that looks like a table saw combined with a jointer?
Abbas, Castro Valley, CA