


Share your craft projects
Make new craft buddies
Ask craft questions
Blog your craft journey

Mike40
1074 posts
and
35 followers
in over 11 years
in over 11 years
CHRISTMAS GIFT BASKETS #5: Mitering the basket sides
This is
part 5
in a
8 part
series:
CHRISTMAS GIFT BASKETS
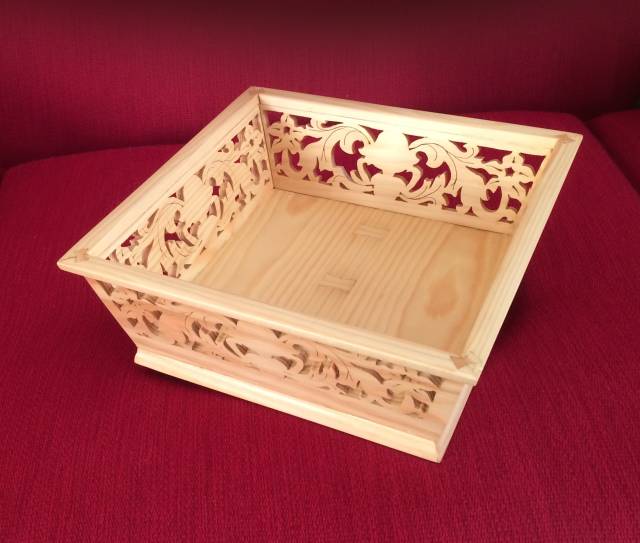
I had big plans for lots of progress today, but I wound up doing a lot of chauffeur work instead so I didn’t get into the shop until late afternoon. I did manage to cut the miters for the basket sides and I will cover how I did that in this episode.
Compound Angled miter set-up
- Making an angled fence.
As most of know, miter angles are usually pretty accurate with the saw set to cut 45 deg. angles with the cut being done at 90 deg. However when we tilt the saw away from 90 deg. to produce a compound cut, we usually don’t experience the same accuracy. That’s why I try to avoid using the tilt angle settings on my SLMS.
Instead, I prefer to use an angled fence cut at the slope angle which I can hold the workpiece against in the same position it will occupy in the finished project and then just use the 45 deg. setting to make the miter cut. It should turn out quite accurate even if the fence is not exactly the desired angle as all the sides will be the same and should fit together perfectly.
To make the auxiliary angled fence I ripped a 2 × 3 at 15 deg. This was then set up on top of an MDF platter on the miter saw table to create a cutting surface that would prevent tear-out. The auxiliary fence was then screwed onto the MS fence through factory drilled holes. See below

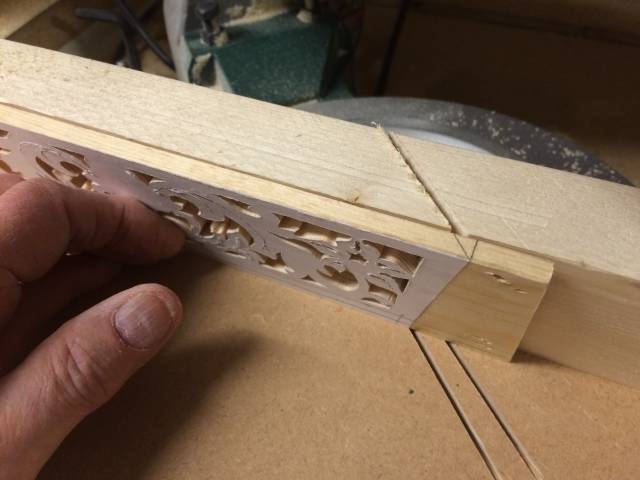
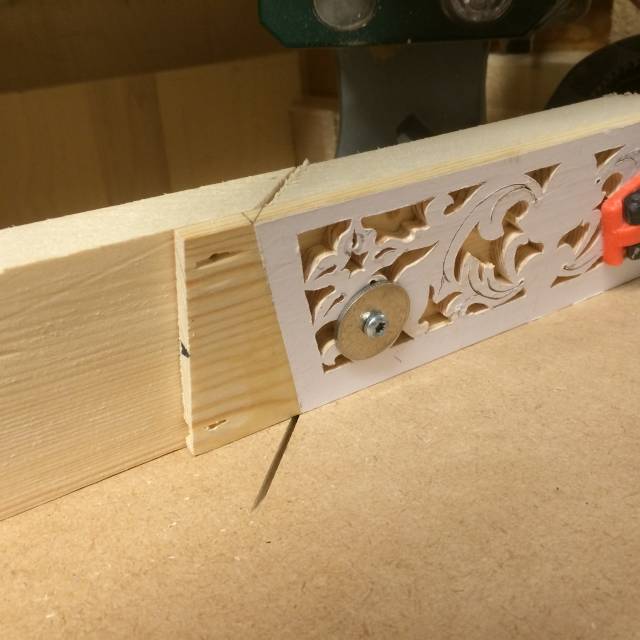
Ordinarily the work pieces would be of uniform length, but mine weren’t because my stop moved a little while I was cutting the sides to length. I therefore thought it wise to mark the actual miter cut lines on each one. A lot more work, but worth it since destroying even one basket side would take me more than two hours of scroll saw work to replace. I then used the markings to line up with the miter cut I had previously made in the fence. I was able to easily hold the pieces by hand while cutting on the right side of workpieces. The left hand miters with the saw position set at 45 deg. on the other side were however a different story. To hold the workpiece there you would have to have your hand right under the saw or have it clamped, neither of which is possible because the saw is in the way while cutting, so I had to figure out an easy way to hold the workpiece. The solution turned out to be pretty simple. I just used a screw with a washer screwed to the fence in right through the workpiece fretwork. It took a little more time, but again worth it to not ruin the workpieces and get a very accurate result. See below
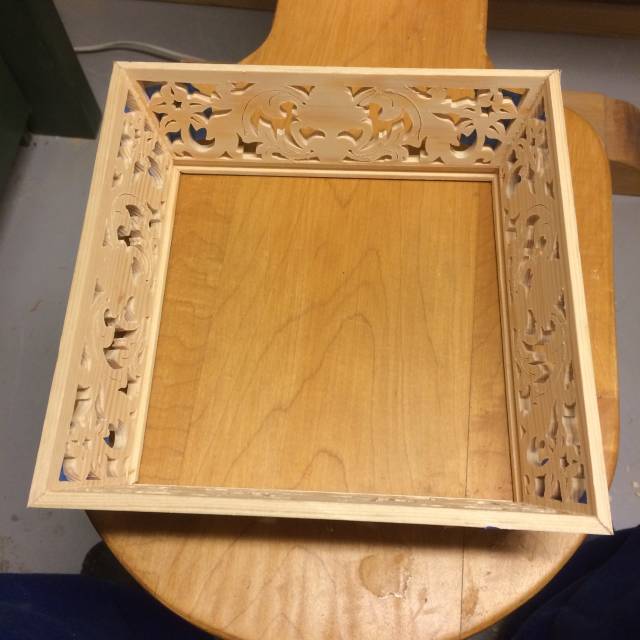
* *Trial assembly*
The cutting went perfect and I felt relieved that no damage was done. Next up was to tape up the sides to see the preliminary result. Here is the first one. The miters came out perfect! See below
after that I cut the edges of one bottom piece to size with 15 deg. angle on all four edges and this also fit well so I can use the dimensions for the other bottoms. * See below*
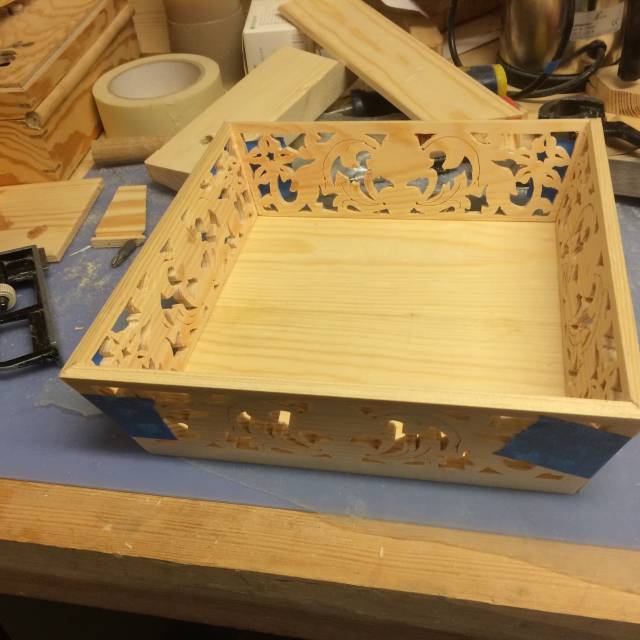
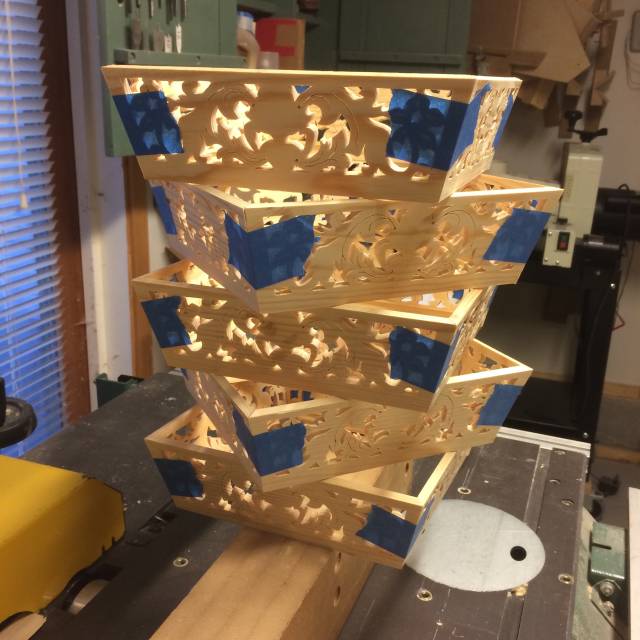
Here they all are minus bottoms taped up. They all came out as good as the first one, and why not considering the care I took to insure that they would? See below
TOMORROWS WORK
I plan to trim the other bottom pieces to size and then cut and glue in the 3 bow ties on each piece. When that is finished I will be gluing up the sides with the bottoms installed. Next on the agenda will be the top rims together with the bow ties on the mitered corners and then the feet if I get the time. Thanks for reading.
Mike, an American living in Norway
3 Comments

Interesting method to cut the compound mitre. When I made an octagon beveled out to 30°, I found a website that calculated compound mitres and used that information to build a sled for my table saw.
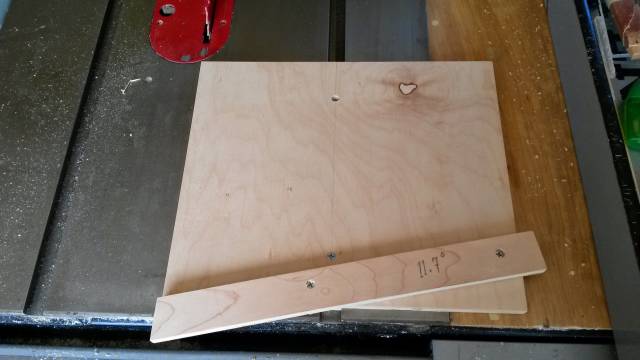
The sled fence was angled at 11.7° and the blade beveled to 19.4° if I recall. This achieved mitering for an octagon (22.5°) with an outward bevel of 30°.
Honestly, I didn’t even think about using my CMS. I suppose I could have saved a bunch of math and jig building headaches if I’d used it. I mean, duh… It says what it does right in its label. LOL
Losing fingers since 1969

Looking good Mike.
I am dying to see the sanding part:)
Abbas, Castro Valley, CA
Brian I did the two settings thing for quite a long time myself, but I found the angled fence method in a Fine Woodworking article a few years ago. This is a great method because not every miter saw has the tilt function and it also eliminates the math, although you can easily find angle tables for compound cutting settings on the net to avoid doing the math, which is what I did.
Abbas I hope I will be doing at least some of that today.
Mike, an American living in Norway