


Share your craft projects
Make new craft buddies
Ask craft questions
Blog your craft journey

MsDebbieP
1395 posts
and
54 followers
in over 12 years
in over 12 years
WoodworkingWeb Theme: Milk Paint Finish
Milk Paint Finish: what is it; why use it; and how to get the best results?
Let’s start with the “what”. Milk paint has been around for thousands of years and uses, .. wait for it ….. “milk” for painting! It is actually “casein”, a component of milk, that is used, mixed with lime (or lemon, if you want the “Martha Stewart” method) and, sometimes, a little borax to help break down the casein and to aid in preserving the mixture, which, by the way, does not keep for very long – it is milk, after all! With the milk prepared (or milk curds, using the lemon method) all you need to do is add a little pigment and you are ready to go….
The process has many pluses:
1. did you notice any toxic ingredients, as you’d find in latex paints? No. Although the lime is a little harsh, it can all go down the drain during clean-up!
2. it’s been around for thousands of years — doesn’t that in itself make it special?
3. you can do so many things with it, such as layering of colours to create, well… “wow” factors!
4. it doesn’t chip
5. it creates texture, subtleties in colour, richness, and stories, by its non-uniform finish
6. it can be applied any number of surfaces, including MDF
7. it lets the grain show
8. it dries quickly (want to get that project done in a day?)
9. and it has been said that it gets better with age. Nice.
and 10 …. well, I’m going to leave that one up to you: WHAT IS A PLUS FOR USING MILK PAINT?
Now, how to best use it:
I’m not the one to give the “how to’s” for this. I’ve read that it is really easy yet at the same time challenging because it’s not what we are used to.
- After the first coat, you are thinking “oh no, what have I done” but after the second coat you are grinning and saying, “oh yah!”.
- Sanding is important as the milk paint needs to seep into the pores of the wood.
- And here is perhaps words of great wisdom: “[it] dries to how it wants to look and not necessarily how you want it to look.” link
- on the same site mentioned above, it talks about the temperature in the room and of the water used impacting the final results of the paint, as well as the type of brushed used and many other factors. (This sounds intriguing.)
- and again, I’ll leave this list up to you to finish: WHAT ARE YOUR TIPS RE: USING MILK PAINT?
Looking for inspiration?
Now it’s your turn: show us your MILK PAINT finishes.
Tag your project as such, (milk paint), and then share them (embed) here in the comments as well.
And don’t forget to share your tips on using milk paint as well as reasons why you should give it a try!
-——————————————————————————————————————————————————————————————-
REMEMBER TO TAG YOUR CREATIONS … so that they are shown in the THEME galleries!
-——————————————————————————————————————————————————————————————-
JAGO - just a grandma’s opinion
8 Comments

The first thing I learned is to wipe the wood/project down with a very wet rag or sponge immediately prior to adding the milk paint. The water raises the wood grain and helps the milk paint adhere to the wood.
The second thing I learned is that making homemade milk paint with quark, is by far the most superior of the milk paints. The commercial stuff works, but is inferior IMO in that the commercial companies use powdered milk to make their milk paints.
- Why is that an issue? — Because the fats in whole milk get in the way of adhesion. When making your own milk paint, you should be using “fat free” milk, or “2%” at the most. The commercial milk paints work, however they bleed off and “stain” for weeks longer than homemade and that makes it a PITA when trying to age the piece in your home without messing up the paint job, IMO.
- You make quark by adding vinegar to your 1/2 gallon of “warm” fatfree milk, to help make it curdle quicker. DO NOT over stir the vinegar into the milk! Pour in one cup of vinegar and make ONE SINGLE swirl with a spoon and STOP! Too much stirring and you will cause the curds to be too small and weak. That will result in a weaker paint mixture. The quark should be ready in about 48-72 hours or so.
- WARNING — cold milk makes small curds and that weakens the paint.
- You then pour off the whey (clear stuff) by pouring the mixture through a cheese cloth to catch the quark/curds. You may have to ball up and slightly squeeze the cheese cloth, but NOT too much.
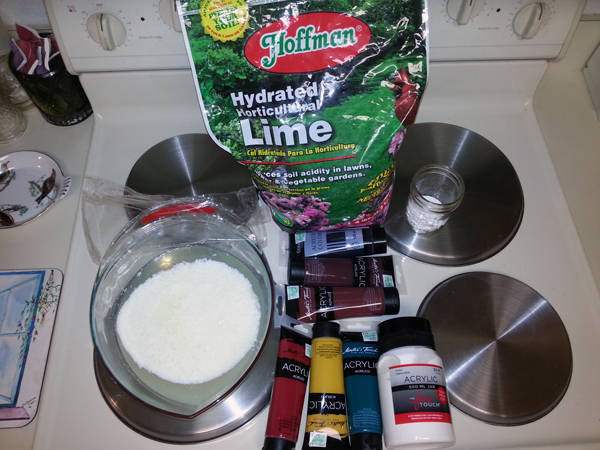
- You will end up with a clump of quark that you put in a mixing bowl and add a small amount (<1/4-cup)of garden “lime”. The adding of lime will turn this mass into the paint you desire, though you need to mix with the blender completely.
- Try NOT to add water, as it is way too easy to end up with a too thin paint, called a wash. It will stick just as well but will be transparent with just a hint of color. You add the acrylic pigment color of choice now, by just squeezing the pigment tube. No added water. I used 4oz tube per 1/2 gal of milk paint mix. This makes a bit over a quart of paint.
- On the plus side, commercial milk paints flow and mix smoother than homemade paints. There are usually no curds present/visible and the finished product look very much like a latex paint (NOT good if you are going for a more natural finish).
- Homemade milk paint will have many small white curds present, regardless of the coloring/pigment you choose to color it with. It helps to use a powered mixer to blend your paint, though that will not eliminate the curds completely.
The bottom line is feel free to experiment with making milk paint. The garden lime is cheap at HD for ~$5-8 for a 3-5lb bag(lifetime supply), and you can buy milk by the gallon and save. I bought my acrylic pigments at Hobby Lobby.
Do be careful about making a mess, as it is hard to clean up and you HAVE TO clean up before it dries. Never let you mixing tool/utensils get dry either as this stuff stick permanently. Keep a large bowl of water handy to dip thing in.
Have fun!
HorizontalMike

Thanks for the tutorial.
Abbas, Castro Valley, CA
that’s awesome Mike…. thanks for finishing off the information with all the details.
JAGO - just a grandma’s opinion
By the way, I use the liquid pigments and not the powdered pigments when making milk paint. Either will do, but remember about how much H2O you are using and adjust according to which type of pigment you choose to use. That said, sometimes you may actually “want” to make a thin transparent paint called a “wash.”
Here are some recipes and instructions to consider when making milk paint.
Earth Pigments Recipe
HorizontalMike

I’m doing a pine mock-up table getting ready for a more pricey elm one. I had no idea what I was going to do with the pine table …now maybe I do! Thanks!
-- Alec (Friends call me Wolf, no idea why)
very grateful to HMike for his experiences and knowledge!
This week I learned an Ojibwe phrase meaning: “We are on this journey together” … how wonderful to see that being played out here!
JAGO - just a grandma’s opinion

Great tutorial, I have never used milk paint before but after reading this it makes me want to give it a try.
-- Paul--- Creativity is allowing yourself to make mistakes. Art is knowing which ones to keep. — Scott Adams
Oh, and I forgot. Don’t forget to think about Miss Muffet as you eat your curds and whey, urh uh milk paint… ;-)
HorizontalMike