


Share your craft projects
Make new craft buddies
Ask craft questions
Blog your craft journey

shipwright
2135 posts
and
113 followers
in almost 12 years
in almost 12 years
Marquetry Jewellery Box #1: A tribute to my mentors
This is
part 1
in a
17 part
series:
Marquetry Jewellery Box
It seems like only yesterday that I built my first chevalet from a few photos on the internet and began to try to figure out how to use it. Well it wasn’t yesterday and it wasn’t last year either. It was almost four years ago and while I did learn on my own and produced some reasonably good pieces of work, things really started to ramp up for me when I attended The American School of French Marquetry in Feb of 2012 and 2013.
The skill training was invaluable but the inspiration far outweighed it in its effect on my work. I was suddenly able to understand what really good marquetry was and how long a road lay ahead of me. Patrick and Patrice are really amazing practitioners of this art and I feel very privileged to have met them and had occasion to learn from them.
One thing I remember that Patrick told me the first year, when I asked him what I should do to really improve, was “Go to France and buy as much sawn veneer as you can afford.” It sounded a little out of my reach at the time but it grew on me and last year I went to Paris and did buy a big pile of sawn veneer
So …………… after almost a year of procrastination, I am finally beginning my first project with this precious material and I think it is only fitting that it be an homage to my mentors. The project is, on the surface, a jewellery box inspired by the wonderful reproduction piece that headlines Patrick’s blog.
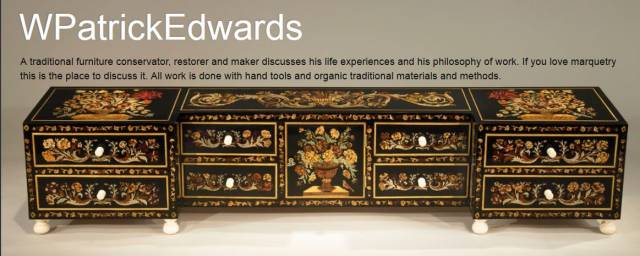
I am not about to copy his work and in fact my box will be quite different but Patrick’s box and the many fine pieces that he and Patrice have produced are all the inspiration behind it.
So what will mine look like? I don’t really know exactly because I’m not finished it yet but there are a few parts that are now decided and I’ve started working on both the box and the marquetry so it’s time to start a blog since it’s been a while.
This is about as complex as plans get on paper for me and even this was done really more to describe it to others. The real design is all in my head where I can change it at a whim without an eraser (or eraser tool).
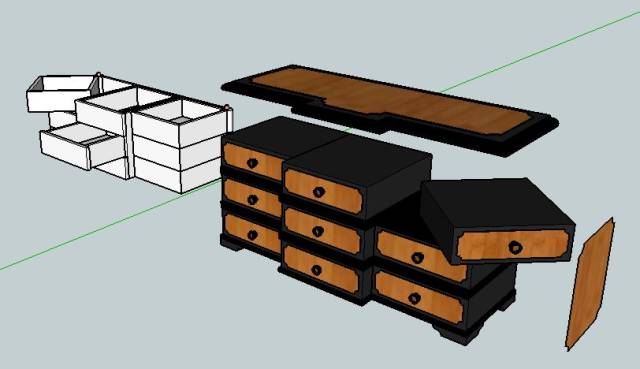
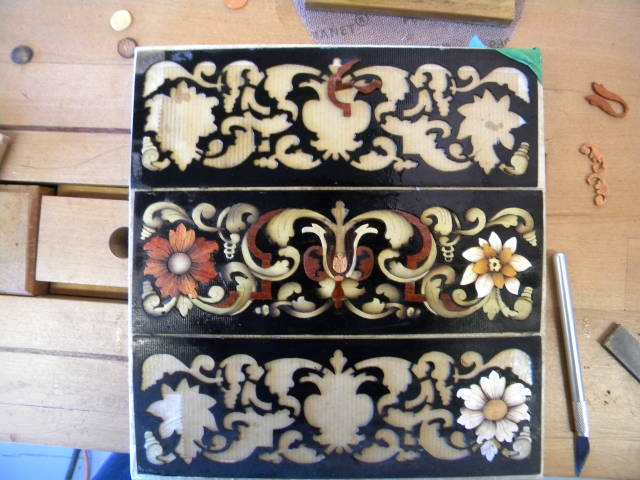
The top, ends, and drawer fronts will all have marquetry and like Patrick’s, the background will all be ebony. There will be three pull out and six cantilevered drawers. The drawer fronts will be a series of modifications of this one from craftsmanspace.com.
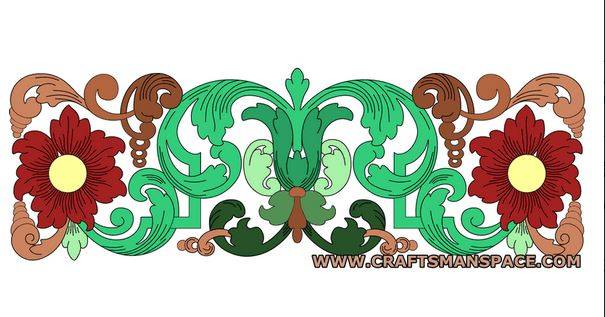
I retraced it in Inkscape and added some variety in the flowers. There will be only three flowers but by using left and right mirror images and changing colors, they should all be different. Cutting for the drawers will be piece by piece as it lends itself to the repetition but the ends and top will likely be done in painting in wood.
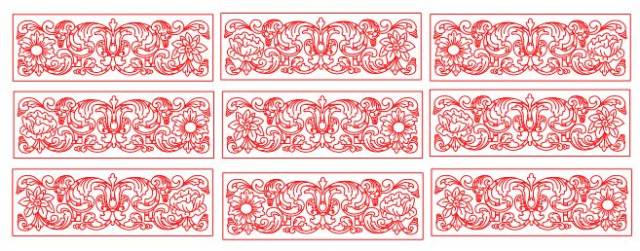
Here is my drawer marquetry plan.
And just to get your attention, jumping way ahead, here’s a shot from today. The green Poplar pieces and the flowers are permanent. The rest are “practice pieces”. I’ll explain them next time.
Thanks for looking in.
Paul
The early bird gets the worm but its the second mouse that gets the cheese.
4 Comments

Incroyable! This is going to be a true showpiece.
Losing fingers since 1969

This will be a beauty and an inspiration Paul.
Mike, an American living in Norway

That is going to be a very interesting project.
Although I have not done any marquetry yet, I think it is one of the most fascinating aspect of woodworking.
Creating beautiful pieces like this one you are about to do with such tiny pieces that bring it to life is just incredible.
I have seen “painting” done with marquetry and it’s mind blowing. What’s better in your case is we get to watch the action.
Abbas, Castro Valley, CA
This is going to be an amazing piece of artwork. I’m a little intimidated by marquetry but it is on my list of processes to learn. I’ll be following your process with great interest
Anna